Making MPEG Movies
This page focuses on creating MPEG-1 movies (video only)
using NERSC and LBNL UNIX computers.
The resultant movies can be played using any MPEG-1 player directly
or from a web page.
This page describes what you need to consider before you make
you make your movie;
two methods for creating a movie;
and some advanced tips for the more adventuresome user.
Note: The example movies shown in this page do not reflect the normal quality
of output from the graphics & visualization packages used.
We picked the worst way to create the images and movies to illustrate what you should not do.
Creating a movie is at least a two step process. First you need to create the individual frames that will comprise your movie.
You then need to combine these images to create a movie that you and others can play back on a computer.
Almost all computer-generated movie formats use a compression algorithm.
Compression is necessary because of size constraints (size of image times the number of the images to make a movie (30 frames per second) equals hundreds to thousands of megabytes).
The MPEG-1 standard is one movie format that supports a very good compression scheme.
Others possible formats are Apple's
QuickTime,
and Microsoft's AVI.
This page focuses on MPEG because most platforms support MPEG-1 players and there are lots of plug-ins available for web browsers.
When you decide to make your movie, be prepared to spend more time on creating the movie than you first thought or you would like to.
Movie making is an art. There is no cookbook that will tell you exactly what you need to do to create your perfect movie.
Factors that contribute to the problem is that the final movie size may be the most important factor to one user,
another user is more interested in the highest-quality image, and yet another is interested in portability.
This page is not a course on creating videos nor are we experts in this area. If you are interested in learning more about video and various standards like MPEG, check out the web and books and magazines on video, it's creation, and deployment.
Things to consider before you make the images for your movie:
- It is best to create the images in the correct size to begin with. Most movie creation programs do a poor job of changing size, especially the PC programs we tried. If you need to modify the size, do it before you create the movie, using tools such as imscale ('module load imtools'). NOTE: The two movie making methods described below expect the image size in x and y to be in multiples of 16. If not, depending on the version of mpeg_encode and mediaconvert, they will either resize the images, core dump, or complain and not create the movie.
- Most of the encoding programs expect the files to be numbered sequentially (e.g., mpeg_encode and many PC programs). A correct numbering sequence is: file0000.jpg, file0001.jpg, ..., file1000.jpg. An incorrect sequence is: file1, ..., file10, ..., file100 (because using the wildcard symbol (*) will not sort them correctly).
- Even though the various MPEG encoders can generate movies with various frame sizes, not all viewers can handle them. For example, we had problems viewing the movie on a PC with a 1037x541 movie.
We have been successful with movies of 640x480 or 320x240.
- Keep your frames uncluttered, especially if you are creating a movie with small frames (e.g. 320 x 240 movie).
- Start with a good image. Any compression scheme will degrade the quality of the original.
- Before creating all your frames, you might want to try making a sample movie from a few frames.
This is important because your time-step between frames may be too great, and when played back this creates a jittery movie.
Also, while the individual frames may look great, motion can add visual artifacts that are both confusing and distracting.
- Don't create your frames using the GIF file format.
GIF compresses the color information to 256 colors.
MPEG does not have this restriction.
Use JPEG, TIFF, PNM, or another file format that the mpeg encoder supports.
Also, do not use an image file format that does a lossy-compression on the image.
Movie Creation:
We describe two ways of creating an MPEG-1 movie.
The first method uses SGI software that is available on escher.nersc.gov
and many SGI workstations.
The SGI tool, mediaconvert is very easy to use if you follow the steps below exactly
and gives you a lot of control over the finished movie.
For example, you can do smoothing on each image.
The second method describes using mpeg_encode.
Mpeg_encode was written at UC Berkeley, is free,
and can be installed on your own computer.
Check out http://bmrc.berkeley.edu/projects/mpeg/ for more information on mpeg_encode.
Which one you use is up to you.
Try out both if you can and see which one creates the movie quality and size you want.
Here are two sample movies that show how the two encoders worked with small bouncing balls with their default settings for compression.
In this case, mediaconvert did a better job than mpeg_encode but
created a larger file (490K versus 90K).
mpeg_encode did a better job when the balls were made a little larger and the colors were de-saturated.
Movie 1, notice the balls are not distorted.
Movie 2, the balls are distorted.
With both encoders you can play with changing the compression scheme by modifying the number of I, P, and B frames.
The definition of these frame types are detailed at the Berkeley site mentioned in the previous paragraph or any article on MPEG.
Basically, the more B and P frames you specify, the more compression.
Movie Making Method 1: SGI TOOLS
mediaconvert can convert most image file formats (TIFF, JPEG, AVS, PPM, etc.) and various movie formats to MPEG-1. The GUI interface is very particular on how you specify the images. Follow the steps exactly and make sure you type everything in correctly. The error messages disappears too fast to be useful. If you can't get it to work, create an intermediate movie first (makemovie -o /tmp/outfile.sgi -f sgi -r 30 -c rle24 files*) and than convert this movie to MPEG using mediaconvert. (The GUI interface works better when video is imported.)
- mediaconvert
has a GUI interface, so make sure you have set the DISPLAY variable ('setenv DISPLAY myhost:0').
- To run the GUI interface to convert MEG-1 do:
% mediaconvert &
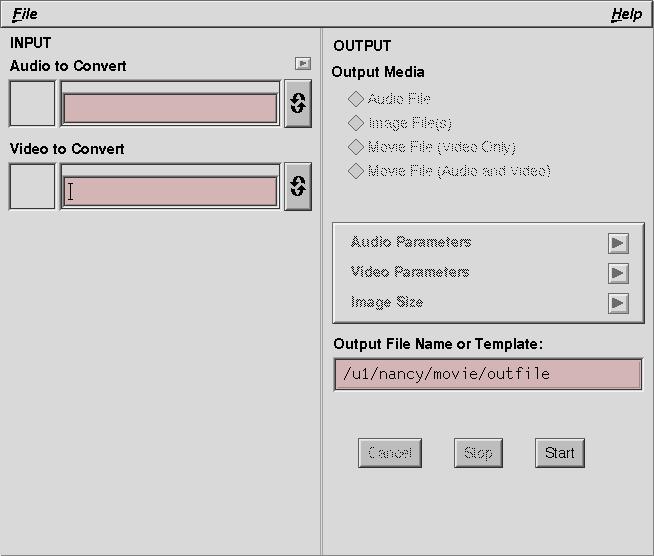
- Type in the name of the directory where your image files are stored in the "Video to Convert" box. Press <Enter> to confirm your input.
- Under the "Video to Convert" box, a new selection will appear, select "Numbered Images". More selection boxes will appear.
- If your files are named: test001.jpg to test119.jpg, enter test###.jpg in the "File Template" box
(a '#' signifies a single digit).
Do not press <Enter> or you will have to re-enter the file name again.
- Type in 119 in the "End" box and press <Enter>.
- Type in 000 in "Start" box and press <Enter>.
- Put the cursor in the "File Template" box and press <Enter>. If everything is correct, a pop-up window titled "Video Input Parameters" will appear.
Select "Close". If the pop-up window did not appear, then you either did not follow
these steps exactly or your frame size does not match
the MPEG encoding specified under "video parameters".
The best method is to create frames that are divisible by 16.
- Change the "File Format" box from "QuickTime" to "MPEG-1 Video".
- Select "Image Size" and on the sub-menu. and make sure that the "Frame Size" is "Original Size"
- Select "Video Parameters" from the main menu and change the "Frame Rate" to 30 on the sub-menu.
- If necessary, modify the "Output File Name" (directory and filename) on the main menu to the name of the movie to be created. I ususally change the '.mpv' extension
to '.mpg' because some PC's are set up to understand the .mpg extension and not .mpv.
When finished you main menu will look something like this.
- Select "Start" from the main menu.
- When finished, try out your movie with mpeg_play (module load mpeg_play), SGI's movieplayer (if you have OpenGL installed on your workstation), or any other MPEG player.
Movie Making Method 2: mpeg_encode:
- On escher.nersc.gov and LBNL systems mounting the Software Farm, you first need to load the mpeg_encode module:
%module load mpeg_encode.
- The settings for mpeg_encode (which files to use, how to pre-process them, etc.) are contained in an ASCII text parameter file.
A sample parameter file is available for download. Things you may need to change in this file are.
- Change the filename listed after the "OUTPUT" line to the name of your MPEG-1 movie.
- Change the "BASE_FILE_FORMAT" line to reflect the image file type. The example expects the JPEG image type.
- After the "INPUT" line, you will see the line: "file*.jpg [000-099]". Change this line to reflect the name of your input image files, the format and the frame numbers. In this case files named file000.jpg through file099.jpg will be encoded. You can have multiple lines specifying the input files.
- Start the movie making process by doing:
% mpeg_encode <name of parameter file>
Useful Tools to know about:
The Visualization Group's software
page describes many useful image conversion and display tools and how to access them.
- Imtools is a suite of very useful image manipulation tools from SDSC.
imconv is useful to converting from one image file format to another.
imscale is good for changing the size of the image and changing the image format.
imstoryboard is useful to change the size, image format, and add margins.
Another useful suite of tools that have similar capabilities are the pbm and netpbm tools (module load pbm).
An example of how to use imconv is:
Convert from a TIFF file to a JPEG file.
imconv 0000.tif 0000.jpg
On NERSC (escher.nersc.gov) and LBNL machines you can convert your CGM
movie file (called gmeta in this example) into JPEG files all at once by doing:
module load ncar
ncgm2jpeg gmeta
- xv
is very useful for displaying an image, converting a single image's format, and for checking on the dimensions of x and y.
- mpeg_play
will play an MPEG-1 movie on a Unix system. SGI also have movieplayer for playing MPEG-1 and other movie formats (QT, AVI) if
you have OpenGL installed on your system.
- If you want to analyze your movie (frames, size, compression, etc.) there are two useful tools. mpeg_stat (module load mpeg_play) gives the most information about your MPEG-1 movie. SGI's dminfo gives more summary information for MPEG-1 and other movie formats.
Advanced Tips:
The below examples and ideas are for the more adventuresome user.
- Depending out what you want to do with your movie, you might want to play
with the Bit Rate found on the "Video Output Parameters" sub-menu of
mediaconvert) or the "BIT RATE" line in the mpeg_encode
parameter file.
You can decrease the size of your movie file if you
lower the bit rate.
This might be important if you are playing this movie across the network.
- Sometimes you cannot create your images without jagged edges or small dropouts in the frames.
mediaconvert has the ability to do some image processing (smoothing) on the individual tool images before the movie is made.
You access this capability by selecting video parameters from the main menu and then selecting the "MPEG-1 Settings Panel".
"Prefiltering" has three options:
None for no smoothing (Sample Movie),
Medium does some smoothing, and Maximum does the most smoothing
(Sample Movie).
Check out the smoothing flags to see which one works best on your frames.
Note: Smoothing will increase the size of your movie file.
- If you really want control and are not squeamish check out SGI's dmconvert. mediaconvert uses it. It looks like mediaconvert has the same capability as dmconvert, but an exhaustive comparison was not done. Be careful, the default mode for dmconvert is to output a 320x240 frame size MPEG-1 movie.
- The reason that the mediaconvert example above explicitly specifies that you change the frame rate to 30 is because this is a very sophisticated tool that is useful if you are outputting to video or film. Remember that film is 24 frames/second, while video is 29.97 frames/second. If you start with a 30 fps movie and you have the Frame rate is set to 24, you will get an MPEG-1 movie with fewer frames. mediaconvert is preserving the duration of the movie (important in non-computer generated movies) and converting from 30 to 24 fps. Thus, a movie with less frames.
- Sometimes you need to concatenate two or more images into one frame. Useful tools for doing this are Imtools and netpbm.


